


We have all experienced that cringe-inducing moment: you reach for your premium headphones, only to find a sticky glaze of earwax on the drivers or a pungent “gym smell” radiating from the foam.
It’s not just unpleasant. It’s slowly ruining your sound. Learning how to clean headphones isn’t about being picky. It’s about protecting your ears, your audio quality, and the money you invested in them.
I’ve seen expensive headphones lose clarity, not because the drivers failed, but because sweat, dust, and skin oils quietly built up over time.
Also, they create a breeding ground for bacteria that cause ear infections and actively muffle your audio by clogging delicate mesh screens. If your audio sounds distant or “muddy,” it’s likely not a hardware failure, but a hygiene one. This guide provides the professional blueprint to restoring your gear’s clarity and longevity.
1) Power Down: Unplug or turn off your device.
2) Dry Wipe: Use a microfiber cloth to remove loose debris.
3) Mesh Care: Hold the mesh downward; gently brush with a dry toothbrush.
4) Disinfect: Wipe hard surfaces with a damp (not wet) cloth and mild soap or 70% alcohol.
5) Air Dry: Ensure all parts dry completely before use.
If you prefer visual guidance, this step-by-step video by Techscrew DIY walks through the full clearing process in real time.
Key Takeaways
- Dirty headphones degrade sound and hygiene. Earwax, sweat, and dust can clog the mesh and make audio sound muffled.
- Bacteria thrive inside headphones. The warm, humid environment around your ears makes regular cleaning essential.
- Use safe tools only. A microfiber cloth, soft brush, mild soap, and 70% isopropyl alcohol are usually enough.
- Clean different materials carefully. Leather, velour, and synthetic ear pads each require different cleaning methods.
- Keep moisture away from electronics. Always use a damp cloth, never a wet one, and allow full air-drying.
- Monthly cleaning preserves performance. A simple 10-minute routine helps maintain sound clarity and extend headphone life.
Why Cleaning Your Headphones Matters
Headphones don’t just sit on your head. They seal against your skin. They trap heat. They hold moisture. They follow you to the gym, onto crowded trains, through long workdays, and late-night playlists.
And in that warm, enclosed space between your ear and the driver, something invisible starts building up. When you wear over-ear or in-ear headphones, you’re creating a small, humid microclimate. According to Dermatology experts at the American Academy of Dermatology, bacteria thrive in warm, humid environments, which makes regular cleaning essential for devices worn against the skin.
Bacteria thrive in warm, humid environments, the same conditions created inside headphones during extended use, as shown in the image below:
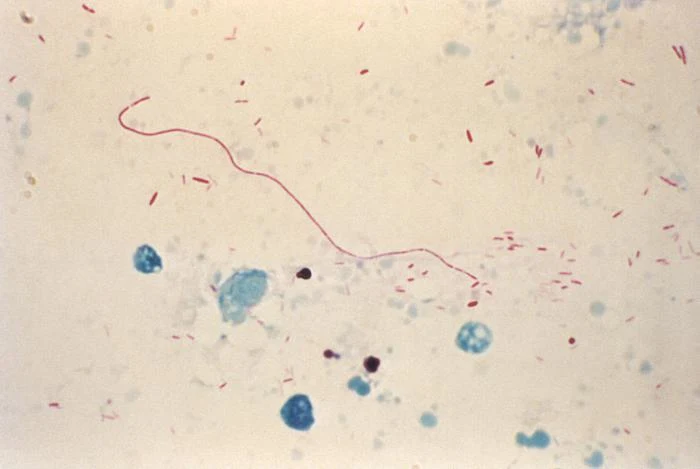
Source: Centers for Disease Control and Prevention
A few minutes of proper cleaning each week changes all of this. It keeps the mesh clear so your audio stays sharp. It pulls moisture away before the salt crystals can settle in. It adds years to a pair of headphones that cost you real money. And maybe most importantly, it keeps the thing you press against your skin every single day actually worth pressing against your skin.
Your headphones work hard for you. This is how you return the favor.
Essential Tools to Clean Headphones Safely
You wouldn’t use steel wool on a Ferrari; don’t use harsh household cleaners on your audio gear. Based on my shop’s standards and manufacturer data from Bose and Beyerdynamic, here is your essential kit:
Cleaning Agents
- Mild Dish Soap & Distilled Water: The gold standard. Distilled water is vital if you live in a “hard water” area, as it prevents mineral deposits from clouding the finish.
- 70% Isopropyl Alcohol (Rubbing Alcohol): Ideal for disinfecting hard plastics and silicone. Crucial Note: Sonos explicitly warns against using alcohol on the Ace headphones, as it can ruin the finish.
- Hydrogen Peroxide: Suggested for its ability to dissolve the proteins in earwax. It is a safer alternative for disinfecting mesh than heavy scrubbing.
- Vinegar Solution: A 1:1 mixture of water and white vinegar is excellent for cutting through greasy films on plastic housings.
Applicators & Precision Tools
- Microfiber Cloths: Use high-gsm microfiber cloths (grams per square meter) to ensure you aren’t just moving dirt around but actually lifting it.
- Soft-Bristled Toothbrush: A dedicated “cleaning” toothbrush is the best tool for the “gravity method” of mesh cleaning.
- Precision Picks: Toothpicks or bobby pins are necessary for detailing, but they require a steady hand.
- Cans of Compressed Air: Essential for clearing out charging ports and headphone jacks without physical contact.
What NOT to Use
Never use bleach, acetone (nail polish remover), or any solvent that smells like paint thinner. I also strongly advise against using a vacuum on built-in microphones. The suction pressure can easily tear the microscopic internal diaphragms, rendering your noise cancellation or call quality permanently degraded.
How to Clean Over-Ear Headphones
Before you introduce moisture, perform a “pre-clean” by wiping the entire unit with a dry microfiber cloth to remove loose dust that could otherwise turn into “mud” once wet. Over-ear and On-ear headphones require a multi-material approach.
How to Clean Headphone Pads: Material Science
- Velour and Alcantara: Common on professional studio gear like the Beyerdynamic DT series. These are porous and “trap” oils. Never use soap. In my experience, soap residue clogs the microscopic fibers, making them feel stiff and scratchy. Use a dry cloth or a very lightly moistened one with water only.
- Genuine Leather: This is skin. It needs to breathe. Use a damp cloth followed immediately by a dry one. I recommend an economical application of a dedicated leather conditioner every six months to prevent the leather from becoming brittle and cracking.
- Protein (Synthetic) Leather: Used in most modern wireless sets. This material is prone to flaking due to salt buildup from sweat. Use a moist cloth with a drop of mild soap, ensuring you wipe away all residue afterward to stop the chemical breakdown of the outer coating.
How to Clean a Headphone Headband
The headband absorbs hair products and oils, which can lead to permanent staining. Use a “damp, not wet” circular motion. For plastic or metal structural bands, a quick wipe with 70% isopropyl alcohol (unless you’re using Sonos Ace) is the most efficient way to remove grime.
How to Clean Headphones Cushion: The 10-Tab System
For a truly professional clean, you must remove the cushions. Brands like Bose use a specific mounting flange system.
- Removal: On models like the QuietComfort, gently pull the top of the ear cushion away from the housing. You will hear a series of “clicks” as the 10 plastic tabs release.
- The Scrim Nuance: Below the cushion is the “scrim,” the fabric covering the driver. If you are replacing these, look for the “L” and “R” markings. The Bose source notes that new scrims come with adhesive tape strips. You must peel the backing and align them perfectly without pressing on the center of the driver, which could crush the delicate electronics.
- Reassembly: Line up the cushion and press the edges until you hear each of the 10 tabs snap. If you don’t hear the snap, your “acoustic seal” is compromised, and your noise cancellation will suffer.
How to Clean In-Ear Headphones
In-ear monitors (IEMs) are the front lines of the “wax war.” Because they sit deep in the canal, wax buildup isn’t just a possibility; it’s a guarantee.
How to Clean Headphones Mesh: The Gravity Method
This is the most important technique I teach. Always hold the earbud with the mesh screen facing the floor. Use a dry, soft toothbrush to brush the mesh. By using gravity, the dislodged wax falls out of the earbud. If you hold them facing up, you are simply pushing the debris through the mesh and onto the driver, which will eventually lead to a permanent loss of volume.
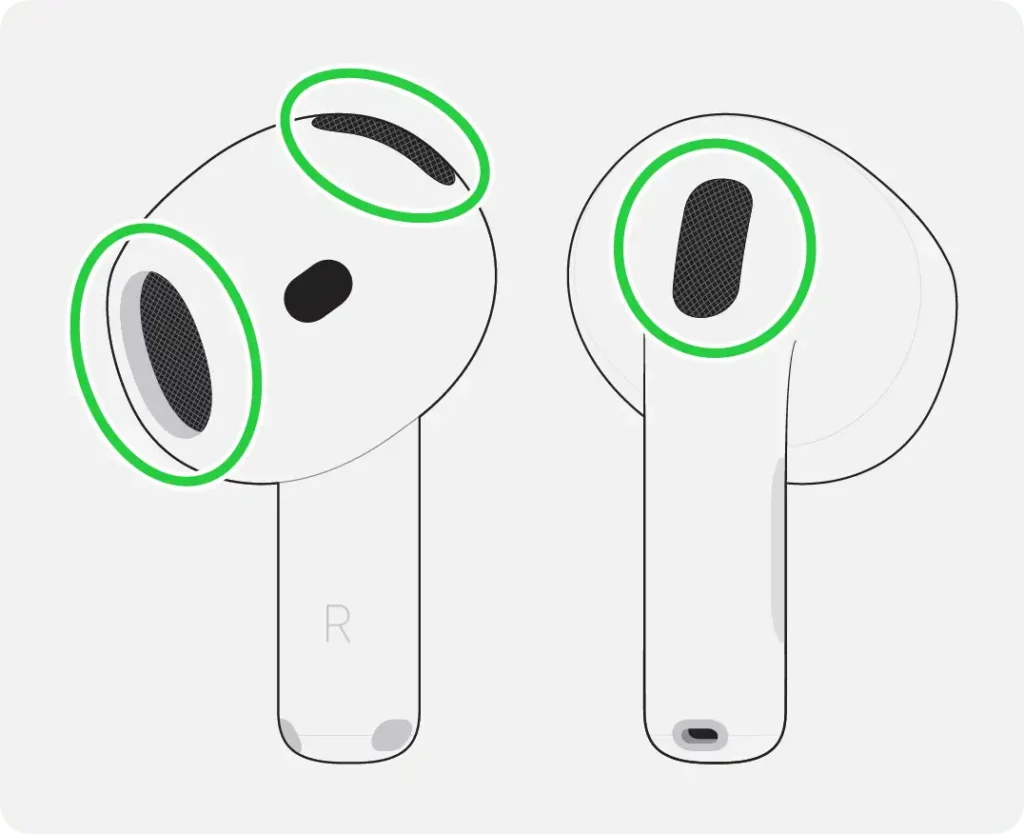
Source: Apple Inc.
Removing Earwax Safely
For stubborn wax, use a toothpick or bobby pin to “flick” the wax out of the edges. Do not “poke.” Puncturing the mesh is the #1 reason earbuds end up in my repair bin; once that screen is pierced, the frequency response is ruined. If the wax is particularly hard, a tiny drop of hydrogen peroxide on a Q-tip can help soften the proteins before you brush.
How to Clean Headphones’ Wire
Cables are often neglected until they become stiff and break.
- Textile-Braided Cables: Use a damp cloth. Avoid soaking, as the fabric can hold moisture against the internal wires for hours.
- Silicone-Sheathed Cables: These can get “grabby” and yellow over time. After cleaning with a damp cloth, I recommend a light treatment with silicone spray on a cloth. This keeps the sheath supple and prevents the “tangle” effect.
How to Clean Headphones Without Damaging Them
The cardinal rule of the shop is: Damp, not wet. If you can squeeze a single drop of water out of your cloth, it is too wet. Moisture is the natural enemy of voice coils and circuit boards.
- Unplug First: Never clean a device that is charging or powered on. This prevents accidental shorts.
- No Direct Heat: I’ve seen countless pairs of $400 headphones with “warped” housings because a user tried to speed up the drying process with a hair dryer. High heat can melt the adhesives that hold the drivers in place. Always air-dry on a flat surface in a well-ventilated room.
- Patience is Key: Let your headphones sit for at least two hours (longer for velour) before reassembling or powering them on.
Brand-Specific Deep Dives
Generic advice is fine until it isn’t. Until you’ve wiped your AirPods Max with the wrong solution and watched the finish dull overnight. Until you’ve soaked a mesh tip that was never meant to see moisture and wondered why it sounds wrong now. Every premium headphone brand has its own materials, its own engineering quirks, its own specific way of punishing you for cleaning it incorrectly. So let’s stop guessing and start getting specific. Your gear deserves better than a one-size-fits-all approach, and honestly, so does your wallet.
How to Wash AirPods Max Ear Cups
The AirPods Max is a masterpiece of industrial design, but that knit mesh canopy on the headband and the magnetic cushions require specific care. The cushions are easily removable; simply pull them straight off. Since they are a mesh-heavy fabric, they can trap a significant amount of moisture. Ensure they are bone-dry before reattaching, or you risk trapping humidity against the aluminum housing, which can cause internal condensation.
How to Clean Apple Headphones
For standard AirPods, the focus should be on the sound ports. For AirPods Pro, remove the silicone ear tips entirely and wash them in warm, soapy water. Ensure the “click-on” mechanism is clear of debris before snapping them back into place.
How to Clean Sony Headphones
The Sony WH-1000XM series features highly sensitive touch-capacitive housings. Avoid using heavy amounts of alcohol on the right earcup, as it can occasionally interfere with the touch sensors. Stick to a dry or slightly damp microfiber cloth for the exterior “skin” of the earcups.
How to Clean a Headphone Jack
If you experience “static” or your headphones keep cutting out, the jack is likely full of pocket lint.
- Compressed Air: Use the thin nozzle to deliver short, sharp bursts of air. This is the only safe first step.
- The Paperclip Method (The Last Resort): If air fails, you can use a straightened paperclip. However, I must warn you: the internal “fingers” (the metal contacts) inside the jack are very delicate. If you scratch or bend these fingers, the jack becomes permanently unusable. Use a “hooking” motion rather than a “scraping” motion.
Common Mistakes to Avoid
- Using Too Much Water: This leads to “wicking,” where water travels up the fabric and into the electronics.
- Vacuuming Microphones: As per Sonos’ warnings, the pressure change can destroy the microphone’s diaphragm.
- Using Harsh Solvents: Acetone will literally melt most headphone plastics.
- Reassembling Damp: This creates a “mold trap,” which can lead to skin rashes and a permanent sour smell.
When to Give Up: Replacement vs. Cleaning
In my experience, no amount of cleaning can save “flattened” foam. If you look at your ear cushions and they no longer “rebound” when pressed, or if the “acoustic seal” feels loose, the foam has reached the end of its life cycle. Beyerdynamic and Bose both offer replacement kits for a reason. Replacing your pads every 1-2 years isn’t just about hygiene; it’s about restoring the soundstage and bass response to “factory-new” levels.
Additionally, many users worry about “Headphone Dents,” a temporary indentation in the hair or skin from long-term wear. While cleaning won’t prevent the physical pressure, keeping the pads clean prevents the skin irritation and “breakouts” that often accompany this phenomenon.
How Often Should You Clean Headphones?
- Post-Workout: A quick wipe with a dry microfiber cloth should happen after every use to remove salt and moisture.
- Weekly: A general wipe-down of the headband and exterior plastics.
- Monthly: A “Deep Clean.” Remove the cushions, brush the mesh using the gravity method, and disinfect the surfaces.
Conclusion
Mastering how to clean headphones is an investment in your listening experience. By spending ten minutes a month on maintenance, you ensure that your gear provides the same “crisp, clear sound” it did on day one.
High-quality sound depends on precision. Your headphones are engineered to create an exact acoustic seal between the drivers and your ear. When that precision is protected, the music feels alive. When it’s ignored, performance slowly fades.
If you’re curious about how that precision actually works inside the drivers and acoustic chambers, here’s a perfect article explaining how headphones work.
Remember: use the right tools, respect the material science of your pads, and always, always let them air dry. Make this a part of your weekly routine, and your ears, your wallet, and your audio quality will thank you.
FAQs
1) Can earwax damage headphones?
Absolutely. Beyond muffling the sound, the acidic nature of earwax can eventually degrade the delicate materials of the mesh screen and the adhesive holding the driver in place.
2) Why do my headphones smell?
Bacteria buildup. When sweat is trapped in the foam and not allowed to dry, it creates a “locker room” odor. Regular cleaning with mild soap and 100% air-drying is the cure.
3) Can I use alcohol wipes?
Yes for Sony and Bose hard plastics; No for Sonos Ace or genuine leather. Always test a small, inconspicuous area first.
4) How do you disinfect headphones safely?
Apply 70% isopropyl alcohol to a cloth; never spray it directly. For mesh, use a Q-tip dampened with hydrogen peroxide to kill bacteria without flooding the driver.