

")
The first time most people try recording at home, it doesn’t go well. Vocals sound boxy, the room echoes in weird ways, or the mix that felt great in headphones turns to mud in the car. And here’s the thing, it’s usually not the gear that’s holding things back, it’s the room itself.
The good news is you don’t need a huge budget or a professional studio to turn things around. With smart planning and a few essential upgrades, you can build a reliable recording setup that grows with your music.
We’ve worked with plenty of musicians who built everything from tiny bedroom setups to backyard studio sheds, and the same core principles always applied: treat the room, keep the gear simple, and upgrade slowly.
Key Takeaways
- Pick a rectangular, quiet room with solid walls.
- Start with bass traps in corners, then treat early reflection points.
- A basic setup works: one interface, one condenser mic, headphones, and nearfield monitors.
- Clean power with surge protection and tidy cable runs keeps noise away.
- Always check material safety sheets before buying foams or fabrics.
- Build upgrades in stages so you don’t overspend.
Choosing the Right Room for Your Setup
Not all rooms are equal when it comes to sound. Bedrooms and small offices usually work best since they’re rectangular and easier to treat. Perfect squares or rooms with lots of glass cause strong reflections and uneven bass.
Square rooms in particular tend to exaggerate low end. Imagine setting up in a boxy guest room: every kick drums thunders and every bass note lingers.
Move the same setup into a longer rectangular office, add a couple of corner traps, and suddenly the mix feels tighter. That simple shift shows why room shape matters more than most gear decisions.
How Much Space Do You Really Need?
Big studios look impressive, but you don’t need one to make professional recordings. A small, uncluttered room works fine if you use the space wisely. Keep the listening triangle between you and your monitors open. Avoid heavy furniture, where sound should reflect cleanly.
If you have a closet, use it for stands, cables, and spare gear. A tidy floor makes even a modest bedroom feel more like a proper studio workspace.
Acoustic Treatment Makes the Biggest Difference
Acoustic treatment is often the turning point. Bass collects in corners, so start there with traps. After that, place broadband panels at ear height on your side walls and behind your monitors. These tame reflections that blur stereo imaging.
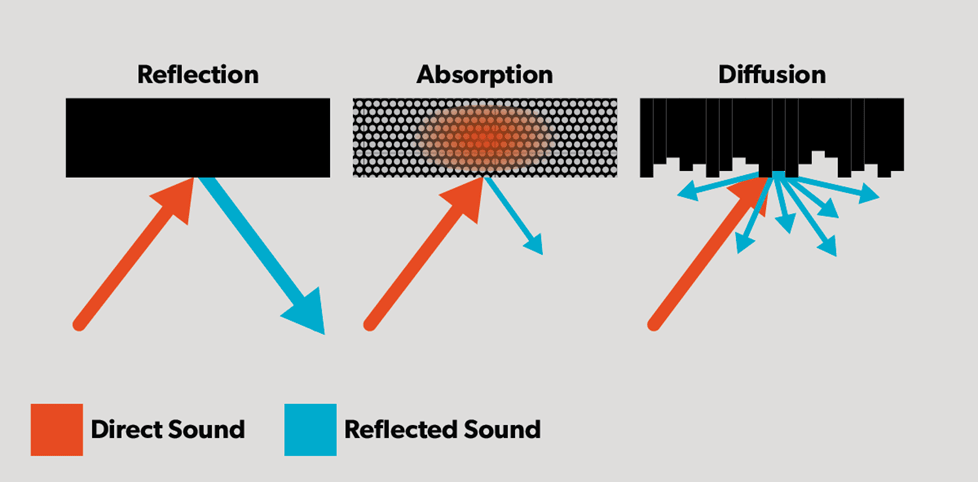
Plenty of people notice the same change: once the corners are treated and early reflections are reduced, a familiar track suddenly feels clearer, with vocals locked into the middle. It’s the kind of upgrade no new microphone can match. For smaller tweaks, the best audio accessories like quality cables and stands can quietly improve reliability without distracting from the mix.
And if your current room is too noisy or cramped, some musicians even go for a backyard studio shed to build a dedicated production room
Testing Your Room With Simple Tools
You don’t need expensive equipment to check your progress. Play songs you know well and notice how the bass and vocals behave.
Run a sine sweep across the low end to hear spots where sound jumps or vanishes. Free SPL meter apps are fine for basic balance checks.
If you want more detail, software like Room EQ Wizard plus a budget measurement mic can give you graphs, but your ears should always come first.
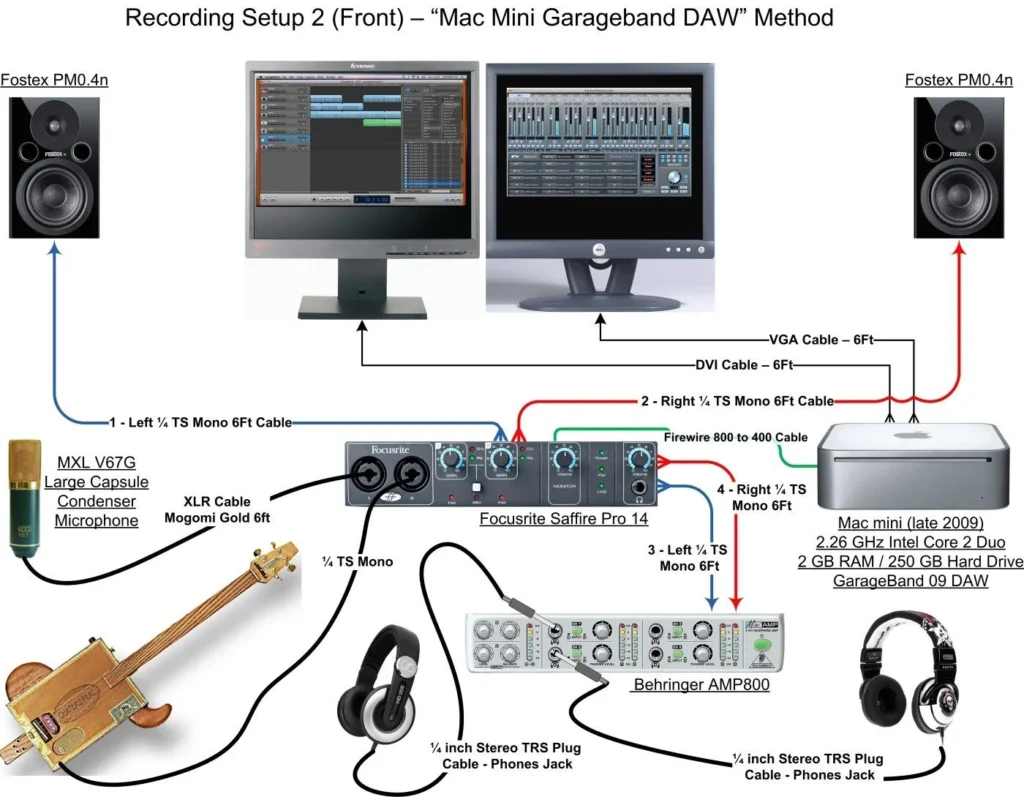
Essential Home Recording Studio Equipment
Gear lists can spiral quickly, but you don’t need racks of gear to start. A two channel audio interface covers vocals and one instrument, and it keeps the path simple.
Don’t skip drivers, ASIO on Windows or Core Audio on Mac. That one step reduces latency and keeps your DAW stable.
Affordable and reliable interfaces include the Focusrite Scarlett 2i2, the PreSonus AudioBox USB 96, and the M-Audio AIR 192|4. These are beginner-friendly and all come with bundled software to get you started quickly.
Companies make setup easier with guides. Focusrite’s Scarlett setup notes walk you through installation in minutes.
Microphones That Work in Small Studios
Start with a cardioid condenser mic. It’s versatile and captures detail for vocals and acoustic instruments. Later, add a dynamic mic if you need to record drums or loud amps.
For beginners, models like the Audio-Technica AT2020 or Rode NT1-A are great entry-level choices because they balance price and clarity. If you want a reliable dynamic option later, the Shure SM57 is a classic that works on just about anything.
Shure’s beginner recording guide explains capsule types and mic placement clearly. Even small changes in angle or distance can noticeably reduce room noise in your takes.
Monitors and headphones that tell the truth
Monitors should sit at ear height, angled toward you to form an equal triangle. Closed back headphones are best during tracking since they prevent bleed into the mic. Open back headphones feel more natural and are better suited for editing and mixing.
Small details matter as much as the big ones. Reliable stands, balanced cables, and sturdy mounts may not feel exciting, but they prevent problems that can interrupt a session. A mic stand that slips or a loose cable can waste takes just as quickly as bad room acoustics.
Simple Starter List
- Two channel interface with drivers
- Cardioid condenser microphone with pop filter
- Closed back headphones plus nearfield monitors
- Balanced monitor cables and one mic cable
- A solid mic stand with clip or shock mount
This basic kit covers the essentials. Each piece plays a role, and together they give you a reliable recording setup for your first year.
Quick Setup Checklist
Here’s a straightforward order to get running fast:
- Place your desk on the short wall, sit one third into the room.
- Position monitors at ear height in an equal triangle.
- Plug gear into a surge protected circuit, keep cables tidy.
- Mount the mic with a pop filter and set gain levels.
- Install drivers, ASIO or Core Audio, and select them in your DAW.
- Play a reference track and tweak monitor angles.
- Save a DAW template with routing and labeled tracks.
Most beginners fight with hum, bad monitor angles, or clipping tracks. A checklist like this won’t fix everything, but it’ll stop the most common mistakes from wrecking your first session.
Power, Cables, and Safety
Reliable power matters more than most people realize. Plug audio gear into one clean circuit and use a quality surge protector. Keep heavy appliances like heaters on a different outlet.
Some home studios eventually outgrow their existing electrical setup, especially if you’re running multiple monitors, rack gear, and computers simultaneously. If breakers trip regularly or you notice your lights dim when equipment powers on, your circuits might need upgrading. Adding dedicated 20 amp lines or installing isolated ground outlets can eliminate noise and provide stable power for your gear. These upgrades require professional work, and for homeowners managing studio costs, exploring services like electricians with financing can make necessary electrical improvements more accessible without delaying your recording plans.
Cables need attention too. Run audio and power lines separately, and cross at right angles if they meet. The National Fire Protection Association offers guidance that applies perfectly to studios.
If you hear hum or buzz, check cables first, move power bricks, or switch to balanced monitor cables. Most of the time, it’s a simple fix.
Materials and Health Considerations
Foams and fabrics used in studios sometimes carry coatings that raise health questions. Always check safety data sheets. The Environmental Protection Agency has detailed info on PFAS, while ATSDR summarizes current studies.
This concern is also central to the ongoing AFFF lawsuit. The case focuses on how the firefighting foam has exposed individuals to serious health risks due to its PFAS content.
Thankfully, more companies now publish emission reports and offer low toxicity options. Asking before you buy helps protect your health and your recording space.
Workflow and Ergonomics
Good workflow makes recording enjoyable. Set your chair so your ears are level with the tweeters. Place pads and controllers close by so you don’t lose focus mid session. Save templates in your DAW so tracks and routing are ready whenever inspiration strikes.
Collaboration has also changed. Many musicians now use apps to listen to music together, which makes remote feedback almost instant.
Budget Paths That Grow With Your Goals
Studios don’t need to be built overnight. Start with essentials and scale as you grow.
| Tier | Estimated Cost Range | What You Get | Who It’s For |
| Starter | $500 to $1,000 | Computer, 2 channel interface, mic, headphones | Beginners setting up their first studio |
| Intermediate | $2,000 to $5,000 | Adds acoustic panels, monitors, second mic, MIDI controller | Musicians refining their workflow |
| Advanced | $10,000 or more | Full treatment, multiple preamps, upgraded converters | Professionals building long term space |
Streaming continues to drive growth in the U.S. music industry, according to Statista. If you’re planning to release music, even a modest investment in your studio pays off.
Conclusion
Setting up a home recording studio isn’t about chasing the perfect gear list. It’s about making the most of the space you already have, fixing it step by step, and building confidence as you go.
Don’t wait for the perfect setup, it doesn’t exist. Record a messy demo today and learn from it. Your first few takes won’t sound like a record, and that’s fine. Every session gets you closer to the sound you want.
FAQs
1) Can a bedroom work as a home studio?
Yes. With corner traps, smart monitor placement, and close mic technique, even a basic bedroom can produce mixes that sound professional outside the room.
2) Should I buy headphones or monitors first?
Headphones are cheaper and great for late night recording, but monitors teach you how your room actually sounds. Many musicians start with headphones, then add monitors once the space is treated.
3) Do I need special power gear?
Usually no. A good surge protector and one clean circuit are enough unless you’re running lots of rack gear or hardware.
4) What’s the most common beginner mistake in setup?
Skipping acoustic treatment. Even basic corner traps and panels can make a bigger difference than expensive gear